Index - InventoryModified: 20/8/2010 19:19:53 CET
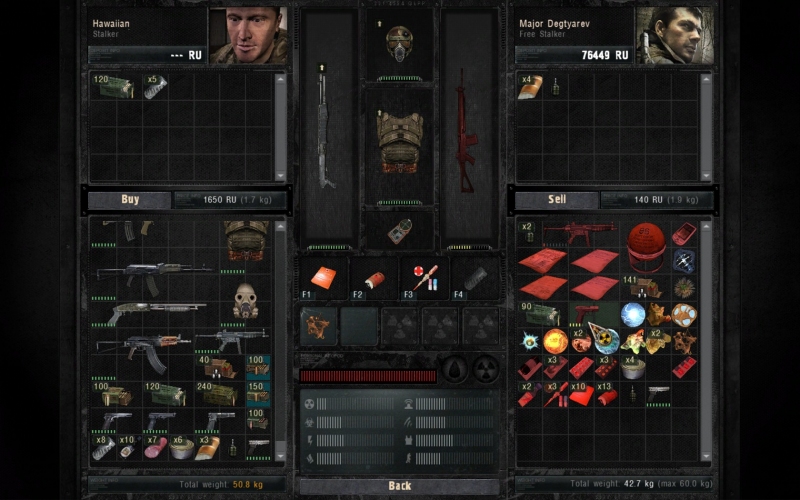
This page presents the same information as on the interactive Inventory description but in a more traditional fashion. You can click different areas in the image below to go directly to the sections describing them.

Artifact containersBack to top
Empty artifact containerBack to top
Empty artifact container
Certain body armors will allow you to carry artifacts, and looking in your inventory screen you can see how many artifact containers are available. Some body armors can be modified to increase this number. When outside the trading screen, you can double-click an artifact in your backpack to move it to an available artifact container.
Locked artifact containerBack to top
Locked artifact container
This icon indicates that the artifact container is not available. Not all body armors have artifact containers, and some only have a limited number; certain armors can be modified to allow more artifacts to be worn.
Occupied artifact containerBack to top
Occupied artifact container
This is an occupied artifact container. Double-click the artifact to move it to your backpack.
Backpack, weight & personal informationBack to top
BackpackBack to top
Backpack
Backpack
These are the items in your backpack. When you are trading you can double-click an item to move it to the "sell" area; items with a red tint indicates items that the person you are trading with is not interested in. When you are outside the trading screen, ie. just looking at your inventory, you can double-click items to perform the default action for them - ie. eat food, move artifacts to an available artifact container, equip a weapon or armor, etc. You can also right-click an item to display the menu, which will show you what actions are available; this is useful for removing weapon attachments, emptying weapons of ammunition, dropping items, and similar. If you hover your mouse cursor over a weapon, you can see if you (or the trader) has any appropriate ammunition for that weapon in your backpack (or his inventory); similarly, you can hover the mouse over ammunition and see which weapons in your backpack, or the traders inventory, use that particular type of ammunition.
Name and factionBack to top
Name and faction
Name and faction
This is your name and faction.
PhotoBack to top
Photo
Photo
This is you... aren't you a handsome lad!
WeightBack to top
Weight
Weight
This is the total weight of all the equipment you are currently carrying.
Weight limitBack to top
Weight limit
Weight limit
This is your weight limit, ie. how many kilos of equipment you can carry before you are encumbered. Exceeding this limit means that running will drain your energy much, much faster; if this limit is exceeded by more than 10 kilograms, you can no longer move and will have to either increase your carrying capacity, or drop some of your equipment. The former can be obtained by using hercules drugs, or wearing certain artifacts; you can also upgrade your body armor with modifications that allow you to carry more equipment. Also, wearing an Exoskeleton will allow you to carry 30 kilos worth of extra equipment.
Equipped itemsBack to top
Body armorBack to top
Body armor
Body armor
This is the body armor slot and it will display the armor you are currently wearing. Body armor is one of your most important pieces of equipment as it provides protection from the many dangers of the Zone, and it may also allow you to use artifacts. Body armor can be modified to increase its protective properties or otherwise change its characteristics.
DetectorBack to top
Detector
Detector
This is your detector, your most loyal friend in the Zone. It not only detects radiation and nearby anomalies, but it can also be used to find artifacts. There are different models of detectors and while they can all alert you to dangers, they have different capabilities when it comes to detecting artifacts. The most basic detector, the Echo, can only indicate if there is an artifact nearby, and it gives off a sound that increases in frequency as you get closer; more advanced detectors, such as the Veles, provides you with an exact location, giving out distance and direction. The most advanced detector, the Svarog prototype, can even pinpoint anomalies, a valuable property for explorers and artifact hunters alike.
HeadgearBack to top
Headgear
Headgear
This is the headgear slot and it will display any helmet, gas mask, or similar, that you are currently wearing. Some body armor, such as the SEVA Bodysuit, comes with a built-in helmet or mask and does not allow you to use seperate headgear.
ModifiedBack to top
Modified
Modified
This icon, appearing both on armor and weapons, indicates that the item in question has been upgraded with modifications. To see which modifications have been applied, hover your mouse cursor over until the property sheet appears; at the bottom you'll see a list of active modifications.
Weapon slotBack to top
Weapon slot
Weapon slot
This is your first weapon slot (default key 2). While the Zone has many passive dangers, alot of threats you'll be facing are in the form of enemy humans and hostile mutants; a pistol, shotgun or rifle is an obligatory companion in the Zone and what weapons you carry will often define just how well you do - and for how long you survive - as a stalker.

In stalker camps, such as the Skadovsk and Yanov Station, they don't allow you to walk around with a weapon out and will refuse you access if you do. Once you are in a stalker camp, you cannot draw a weapon.

Weapon slotBack to top
Weapon slot
Weapon slot
This is your second weapon slot (default key 3).
General informationBack to top
Back buttonBack to top
Back button
Back button
Click this button (or press Esc) to leave the inventory or trading screen. If you are trading with someone, and have items in either the buying or selling area, clicking this button will cancel those transactions.
ConditionBack to top
Condition
Condition
The condition indicator, associated with weapons and armor, provides a representation of the state of your equipment. A full green bar indicates a weapon or armor in mint condition, whereas a yellow, half-full bar means a weapon or armor which condition has deteriorated considerably. Armor in poor condition provides less protection against hazards, and the condition of armor will suffer when you are attacked or exposed to hazards such as anomalies. Weapons in a similar condition are very likely to jam, demanding that you reload before it can be fired again; firing a weapon will, albeit slowly, have a negative impact on its condition. If you are wearing body armor, headgear, or using a weapon in poor condition, certain icons will appear on your HUD. Technicians can repair weapons and armor, often in exchange for money. Weapons and armor can also be modified to improve their durability, making them more robust to wear and tear.
Drop itemBack to top
Drop item
Drop item
When you are watching your inventory, and not trading with anyone, you can click - and while holding down the mouse button - drag items to the outside of the whole inventory area; letting go of the mouse button will drop the item in question. You can also drop items by right-clicking them and selecting the "Drop" menu item; certain items, such as mission critical items along with many documents and PDAs, cannot be dropped.
Health and status iconsBack to top
BleedingBack to top
Bleeding
Bleeding
If you are suffering from a bleeding wound, this icon will flash; the color of the icon indicates the serverity of the condition. Bleeding will cause you to lose health continuously until the bleeding either stops by itself, or it is treated with a bandage or some vinca drugs. Some artifacts can also reduce bleeding.
HealthBack to top
Health
Health
This bar indicates your health; for more information about it, please refer to the description in the HUD.
RadiationBack to top
Radiation
Radiation
If you are suffering from radiation poisoning this icon will flash. The severity is indicated by the color of the icon.
Protection and energy recovery indicatorsBack to top
ArmorBack to top
Armor
Armor
This is your total protection against projectiles coming from firearms.
Energy recoveryBack to top
Energy recovery
Energy recovery
Energy recovery indicates how fast you'll regain energy which is spent when you move; running and jumping is especially tasking for your energy, and you may also be drained of energy when faced with burers. Food and energy drinks especially can improve your recovery rate, and certain artifacts may also provide a positive effect. Some armors and helmets can also be modified with certain upgrades that increase your energy recovery.
Protection against chemical hazardsBack to top
Protection against chemical hazards
Your total level of protection against chemical hazards such as Gas anomalies.
Protection against electricityBack to top
Protection against electricity
This is your total protection against electricity, which is useful when dealing with Electro anomalies.
Protection against impact and ruptureBack to top
Protection against impact and rupture
Total protection against impact and rupture damage which is caused by falling, being hit by thrown objects, and close-combat attack such as bites and claws.
Protection against psy-emissionsBack to top
Protection against psy-emissions
Your combined protection against psy-emissions caused by certain anomalies and mutants.
Protection against radiationBack to top
Protection against radiation
This indicates your total protection against radiation, counting any body armor and/or headgear that you are wearing. This value only indicates protection against radiation coming from the environment, and not radiation that may come from any artifacts that you are wearing; to counter this type of radiation, you'll need to wear anti-radiation artifacts.
Protection against thermal hazardsBack to top
Protection against thermal hazards
Total protection against intense heat and flames caused by eg. the Burner anomalies.
Quick slotsBack to top
Quick slotBack to top
Quick slot
Quick slot
This is one of four quick slots that you can assign different items to, making it fast and easy to use these items. Each slot has a unique hot-key (default keys F1 through F4), and you can assign items such as medkits, bandages, food and drink, and drugs to them. Once you have assigned items to your quick slots, you can see these items in the lower left corner of the HUD. You assign items to your quick slots by dragging and dropping them from your backpack onto the desired quick slot.
Buy buttonBack to top
Buy button
Buy button
If you have enough money, clicking this button will make you purchase all the items in the "buy" area.
Buying areaBack to top
Buying area
Buying area
When trading, you can double-click items in the trader inventory to move them to this area, indicating the items that you wish to buy. Double-click items here to move them back into the inventory.
Cost and weightBack to top
Cost and weight
Cost and weight
This is the total cost and weight for all the items in the buying area. If you have the money to cover the cost, you can click the Buy button to complete the transaction.
MoneyBack to top
Money
Money
This is the money you have. You can earn money by completing missions and selling items to traders and other stalkers. If you help Sultan take over Beards business, you can also pick up a cut of the earnings from Beard on a daily basis.
MoneyBack to top
Money
Money
This is the amount of money held by the person you are trading with. Common stalkers only have a limited amount of money, which puts a restriction on the number of items you can sell to them. Traders have unlimited money, indicated by the three dashes, and will buy as many items you are willing to sell; both traders and stalkers, though, are only interested in certain items such as artifacts, weapons and ammunition.
Name and factionBack to top
Name and faction
Name and faction
This is the name of the person your are trading with, and you can also see which faction that person belongs to.
PhotoBack to top
Photo
Photo
This is a photo of the person you are trading with.
Sell buttonBack to top
Sell button
Sell button
Clicking this button will sell all the items currently held in the "sell" area, given that the person you are trading with has enough money.
SellingBack to top
Selling
Selling
This is the total cost and weight for all the items in the selling area. If the person you are trading with has enough money, you can click the Sell button to complete the transaction.
Selling areaBack to top
Selling area
Selling area
When trading, you can double-click items in your backpack to move them to this area, indicating the items that you wish to sell. Double-click items here to move them back into your backpack.
Trader inventoryBack to top
Trader inventory
Trader inventory
These are the items that the trader has for sale. Double-click an item to move it to the "buy" area.
WeightBack to top
Weight
Weight
This is the total weight of all the equipment in the traders inventory... not sure if this is really useful, unless you plan on buying everything available and need to know whether you can actually carry it or not.

© 2007-2024 Dawnrazor - - @dawnrazor73